一、Linux查看CPU基本信息,可以使用命令:
cat /proc/cpuinfo
例如笔者的虚拟机:
[root@promote ~]# cat /proc/cpuinfo
processor : 0
vendor_id : GenuineIntel
cpu family : 6
model : 37
model name : Intel(R) Core(TM) i5 CPU M 520 @ 2.40GHz
stepping : 5
cpu MHz : 2394.049
cache size : 3072 KB
fpu : yes
fpu_exception : yes
cpuid level : 11
wp : yes
flags : fpu vme de pse tsc msr pae mce cx8 apic sep mtrr pge mca cmov pat pse36 clflush dts mmx fxsr sse sse2 ss syscall nx rdtscp lm constant_tsc up arch_perfmon pebs bts xtopology tsc_reliable nonstop_tsc aperfmperf unfair_spinlock pni pclmulqdq ssse3 cx16 sse4_1 sse4_2 x2apic popcnt aes hypervisor lahf_lm ida arat dts
bogomips : 4788.09
clflush size : 64
cache_alignment : 64
address sizes : 40 bits physical, 48 bits virtual
power management:
可见,笔者这台虚拟机,有一个逻辑CPU,主频是2.4。
延伸:
physical id 物理封装的处理器的id。
core id 每个核心的id。
cpu cores 位于相同物理封装的处理器中的内核数量。
siblings 位于相同物理封装的处理器中的逻辑处理器的数量。
二、如何查看CPU逻辑个数。
方法1:
cat /proc/cpuinfo
processor : 11
vendor_id : GenuineIntel
cpu family : 6
model : 62
model name : Intel(R) Xeon(R) CPU E5-2620 v2 @ 2.10GHz
stepping : 4
microcode : 1064
cpu MHz : 2100.170
cache size : 15360 KB
physical id : 0
siblings : 12
core id : 5
cpu cores : 6
apicid : 11
initial apicid : 11
fpu : yes
fpu_exception : yes
cpuid level : 13
wp : yes
flags : fpu vme de pse tsc msr pae mce cx8 apic sep mtrr pge mca cmov pat pse36 clflush dts acpi mmx fxsr sse sse2 ss ht tm pbe syscall nx pdpe1gb rdtscp lm constant_tsc arch_perfmon pebs bts rep_good xtopology nonstop_tsc aperfmperf pni pclmulqdq dtes64 monitor ds_cpl vmx smx est tm2 ssse3 cx16 xtpr pdcm pcid dca sse4_1 sse4_2 x2apic popcnt tsc_deadline_timer aes xsave avx f16c rdrand lahf_lm ida arat xsaveopt pln pts dts tpr_shadow vnmi flexpriority ept vpid fsgsbase smep erms
bogomips : 4200.34
clflush size : 64
cache_alignment : 64
address sizes : 46 bits physical, 48 bits virtual
power management:
可以看出有12个逻辑CPU。因为processor从0开始,到11结束,说明有12个。
方法2:
cat /proc/cpuinfo | grep name | cut -f2 -d: | uniq -c
例如,
可以看到有12个逻辑CPU。
方法3:
cat /proc/cpuinfo | grep physical | uniq -c
例如,
[root@localhost ~]# cat /proc/cpuinfo | grep physical | uniq -c
1 physical id : 0
1 address sizes : 46 bits physical, 48 bits virtual
1 physical id : 0
1 address sizes : 46 bits physical, 48 bits virtual
1 physical id : 0
1 address sizes : 46 bits physical, 48 bits virtual
1 physical id : 0
1 address sizes : 46 bits physical, 48 bits virtual
1 physical id : 0
1 address sizes : 46 bits physical, 48 bits virtual
1 physical id : 0
1 address sizes : 46 bits physical, 48 bits virtual
1 physical id : 0
1 address sizes : 46 bits physical, 48 bits virtual
1 physical id : 0
1 address sizes : 46 bits physical, 48 bits virtual
1 physical id : 0
1 address sizes : 46 bits physical, 48 bits virtual
1 physical id : 0
1 address sizes : 46 bits physical, 48 bits virtual
1 physical id : 0
1 address sizes : 46 bits physical, 48 bits virtual
1 physical id : 0
1 address sizes : 46 bits physical, 48 bits virtual
也能看出来是12个,不过需要数一下。
更简单的方法还有:
(1)、cat /proc/cpuinfo |grep "processor"|wc -l
直接计算出来是12,都不用数了。
(2)、cat /proc/cpuinfo |grep "physical id"
这个需要数一下才能知道是12。
(3)、cat /proc/cpuinfo |grep "processor"
这个法子不错,直接按处理器排序到11。一眼看出来是12。
三、如何查看每个CPU核心数。
有个简单的命令:
cat /proc/cpuinfo |grep "cores"
可以看到,12个逻辑CPU中,每个CPU都是6核。
其实在查看CPU基本信息里,有个cpu cores:6,直接就显示是6个。
四、查看CPU使用率的命令
top
延伸:
使用权限:所有使用者
使用方式:top [-] [d delay] [q] [S] [s] [i] [n] [b]
说明:即时显示process的动态
d :改变显示的更新速度,或是在交谈式指令列( interactive command)按s
q :没有任何延迟的显示速度,如果使用者是有superuser的权限,则top将会以最高的优先序执行
c :切换显示模式,共有两种模式,一是只显示执行档的名称,另一种是显示完整的路径与名称S :累积模式,会将己完成或消失的子行程( dead child process )的CPU time累积起来
s :安全模式,将交谈式指令取消,避免潜在的危机
i :不显示任何闲置(idle)或无用(zombie)的行程
n :更新的次数,完成后将会退出top
b :批次档模式,搭配"n"参数一起使用,可以用来将top的结果输出到档案内
例如,
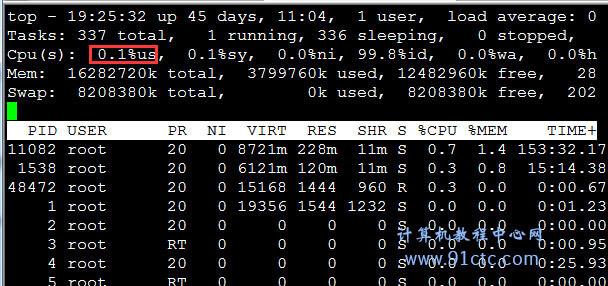
可以看到CPU使用率百分比。Ctrl+C可以退出TOP。
也可以使用命令:cat /proc/stat查看。例如:
[root@localhost ~]# cat /proc/stat
cpu 27115520 242 4622815 4662722506 12504018 246 96658 0 0
cpu0 4126112 0 855568 375445053 10489170 76 32126 0 0
cpu1 2370590 0 291429 389439543 27264 53 6368 0 0
cpu2 1744553 0 225295 390309511 16425 12 3430 0 0
cpu3 1451736 0 256399 390612263 9784 1 3077 0 0
cpu4 911835 0 257589 391264891 7095 0 2000 0 0
cpu5 706379 0 249467 391522706 5312 0 1582 0 0
cpu6 11307712 0 976287 378460372 1915138 0 14559 0 0
cpu7 1069543 0 354557 390922711 9657 0 8219 0 0
cpu8 827844 0 269726 391350780 5797 5 7072 0 0
cpu9 1043103 242 351579 390805163 7193 21 8010 0 0
cpu10 884193 0 298011 391092737 6363 30 6141 0 0
cpu11 671915 0 236902 391496772 4814 45 4067 0 0
intr 3434565703 127 0 0 1 1 0 0 0 1 116 247 0 0 0 0 0 0 0 0 0 0 0 138 113 0 0 0 0 0 0 0 0 0 0 0 0 0 0 0 0 0 0 0 0 0 0 0 0 0 0 0 0 0 0 0 0 0 13094 0 0 0 0 0 0 0 0 0 0 0 0 0 75734895 117 1 1 1 1 1 1 1 1 1 1 1 1 1 1 1 56232283 21536519 17473625 17213052 17575845 0 0 0 0 0 0 0 0 0 0 0 0 0 0 0 0 0 0 0 0 0 0 0 0 0 0 0 0 0 0 0 0 0 0 0 0 0 0 0 0 0 0 0 0 0 0 0 0 0 0 0 0 0 0 0 0 0 0 0 0 0 0 0 0 0 0 0 0 0 0 0 0 0 0 0 0 0 0 0 0 0 0 0 0 0 0 0 0 0 0 0 0 0 0 0 0 0 0 0 0 0 0 0 0 0 0 0 0 0 0 0 0 0 0 0 0 0 0 0 0 0 0 0 0 0 0 0 0 0 0 0 0 0 0 0 0 0 0 0 0 0 0 0 0 0 0 0 0 0 0 0 0 0 0 0 0 0 0 0 0 0 0 0 0 0 0 0 0 0 0 0 0 0 0 0 0 0 0 0 0 0 0 0 0 0 0 0 0 0 0 0 0 0 0 0 0 0 0 0 0 0 0 0 0 0 0 0 0 0 0 0 0 0 0 0 0 0 0 0 0 0 0 0 0 0 0 0 0 0 0 0 0 0 0 0 0 0 0 0 0 0 0 0 0 0 0 0 0 0 0 0 0 0 0 0 0 0 0 0 0 0 0 0 0 0 0 0 0 0 0 0 0 0 0 0 0 0 0 0 0 0 0 0 0 0 0 0 0 0 0 0 0 0 0 0 0 0 0 0 0 0 0 0 0 0 0 0 0 0 0 0 0 0 0 0 0 0 0 0 0 0 0 0 0 0 0 0 0 0 0 0 0 0 0 0 0 0 0 0 0 0 0 0 0 0 0 0 0 0 0 0 0 0 0 0 0 0 0 0 0 0 0 0 0 0 0 0 0 0 0 0 0 0 0 0 0 0 0 0 0 0 0 0 0 0 0 0 0 0 0 0 0 0 0 0 0 0 0 0 0 0 0 0 0 0 0 0 0 0 0 0 0 0 0 0 0 0 0 0 0 0 0 0 0 0 0 0 0 0 0 0 0 0 0 0 0 0 0 0 0 0 0 0 0 0 0 0 0 0 0 0 0 0 0 0 0 0 0 0 0 0 0 0 0 0 0 0 0 0 0 0 0 0 0 0 0 0 0 0 0 0 0 0 0 0 0 0 0 0 0 0 0 0 0 0 0 0 0 0 0 0 0 0 0 0 0 0 0 0 0 0 0 0 0 0 0 0 0 0 0 0 0 0 0 0 0 0 0 0 0 0 0 0 0 0 0 0 0 0 0 0 0 0 0 0 0 0 0 0 0 0 0 0 0 0 0 0 0 0 0 0 0 0 0 0 0 0 0 0 0 0 0 0 0 0 0 0 0 0 0 0 0 0 0 0 0 0 0 0 0 0 0 0 0 0 0 0 0 0 0 0 0 0 0 0 0 0 0 0 0 0 0 0 0 0 0 0 0 0 0 0 0 0 0 0 0 0 0 0 0 0 0 0 0 0 0 0 0 0 0 0 0 0 0 0 0 0 0 0 0 0 0 0 0 0 0 0 0 0 0 0 0 0 0 0 0 0 0 0 0 0 0 0 0 0 0 0 0 0 0 0 0 0 0 0 0 0 0 0 0 0 0 0 0 0 0 0 0 0 0 0 0 0 0 0 0 0 0 0 0 0 0 0 0 0 0 0 0 0 0 0 0 0 0 0 0 0 0 0 0 0 0 0 0 0 0 0 0 0 0 0 0 0 0 0 0 0 0 0 0 0 0 0 0 0 0 0 0 0 0 0 0 0 0 0 0 0 0 0 0 0 0 0 0 0 0 0 0 0 0 0 0 0 0 0 0 0 0 0 0 0 0 0 0 0 0 0 0 0 0 0 0 0 0 0 0 0 0 0 0 0 0 0 0 0 0 0 0 0 0 0 0 0 0 0 0 0 0 0 0 0 0 0 0 0 0 0 0 0 0 0 0 0 0 0 0 0 0 0 0 0 0 0 0 0 0 0 0 0 0 0 0 0 0 0 0 0 0 0 0 0 0 0 0 0 0 0 0 0 0 0 0 0 0 0 0 0 0 0 0 0 0 0 0 0 0 0 0 0 0 0 0 0 0 0 0 0 0 0 0 0 0 0 0 0 0 0 0 0 0 0 0 0 0 0 0 0 0 0 0 0 0 0 0 0 0 0 0 0 0 0 0 0 0 0 0 0 0 0 0 0 0 0 0 0 0 0 0 0 0 0 0 0 0 0 0 0 0 0 0 0 0 0 0 0 0 0 0 0 0 0 0 0 0 0 0 0 0 0 0 0 0 0 0 0 0 0 0 0 0 0 0 0 0 0 0 0 0 0 0 0 0 0 0 0 0 0 0 0 0 0 0 0 0 0 0 0 0 0 0 0 0 0 0 0 0 0 0 0 0 0 0 0 0 0 0 0 0 0 0 0 0 0 0 0 0 0 0 0 0 0 0 0 0 0 0 0 0 0 0 0 0 0 0 0 0 0 0 0 0 0 0 0 0 0 0 0 0 0 0 0 0 0 0 0 0 0 0 0 0 0 0 0 0 0 0 0 0 0 0 0 0 0 0 0 0 0 0 0 0 0 0 0 0 0 0 0 0 0 0 0 0 0 0 0 0 0 0 0 0 0 0 0 0 0 0 0 0 0 0 0 0 0 0 0 0 0 0 0 0 0 0 0 0 0 0 0 0 0 0 0 0 0 0 0 0 0 0 0 0 0 0 0 0 0 0 0 0 0 0 0 0 0 0 0 0 0 0 0 0 0 0 0 0 0 0 0 0 0 0 0 0 0 0 0 0 0 0 0 0 0 0 0 0 0 0 0 0 0 0 0 0 0 0 0 0 0 0 0 0 0 0 0
ctxt 6265469303
btime 1426551690
processes 7425277
procs_running 2
procs_blocked 0
softirq 1862968701 0 592789560 785619 277080030 72116042 0 72554297 243093245 7677488 596872420
可以看到12个CPU使用的情况。
五、查看CPU运行在多少位下的命令
getconf LONG_BIT
[root@localhost ~]# getconf LONG_BIT
64
[root@localhost ~]#
可以看到运行在64位下。
六、查看CPU是否支持64位运算
cat /proc/cpuinfo | grep flags | grep ' lm '|wc -l
[root@localhost ~]# cat /proc/cpuinfo | grep flags | grep ' lm '|wc -l
12
[root@localhost ~]#
等于12,说明12个逻辑CPU都支持64位运算, lm指long mode, 支持lm则是64bit。


文章评论