在更新之前,先把虚拟机全部关机,并且取消所有的自动启动!在更新之前,先把虚拟机全部关机,并且取消所有的自动启动!在更新之前,先把虚拟机全部关机,并且取消所有的自动启动!
1、在电脑上用Xshell之类的工具登录到PVE的SSH下,输入以下命令(带有#开头内容为注释,不需要输入的,只输入不是#开头的,下同):
#修改PVE源
sed -i 's/buster\/updates/bullseye-security/g;s/buster/bullseye/g' /etc/apt/sources.list
#删除PVE企业源
rm -rf /etc/apt/sources.list.d/pve-install-repo.list
2、输入vi /etc/apt/sources.list ,按 i 进入编辑状态,把原来的内容全部删除,复制以下内容进去粘贴,保存退出;
# debian aliyun source
#deb https://mirrors.tuna.tsinghua.edu.cn/debian bullseye main contrib non-free
#deb https://mirrors.tuna.tsinghua.edu.cn/debian bullseye-updates main contrib non-free
#deb https://mirrors.tuna.tsinghua.edu.cn/debian-security bullseye-security main contrib non-free
#deb http://download.proxmox.com/debian/pve bullseye pve-no-subscription
deb http://ftp.debian.org/debian bullseye main contrib
deb http://ftp.debian.org/debian bullseye-updates main contrib
# security updates
deb http://security.debian.org bullseye-security main contrib
deb http://download.proxmox.com/debian/pve bullseye pve-no-subscription
3、输入以下命令更新系统(由于PVE的源在国外服务器,建议全局开飞机,否则更新非常的慢),期间有可能弹出类似下图的提示需要选择的界面,直接无脑的按回车就行:
apt update && apt dist-upgrade -y4、更新完成,输入 reboot 重启PVE;
5、启动好了以后,继续输入以下命令:
apt autoremove -y6、敲命令先查看当前系统内核,然后卸载无用的内核,保持系统干净(强迫症发作了):
#查看当前用的内核
uname -a
#查看系统有多少个内核
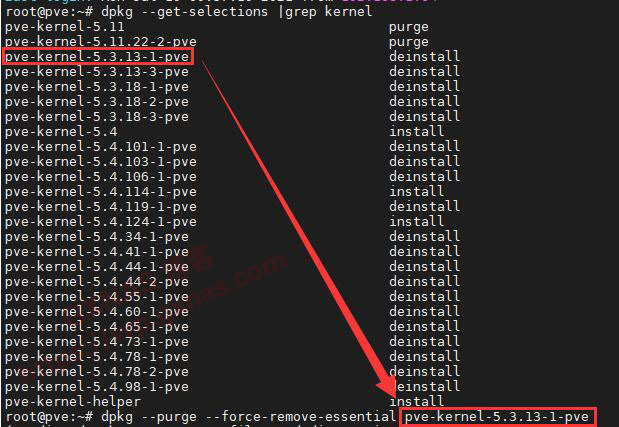
dpkg --get-selections |grep kernel

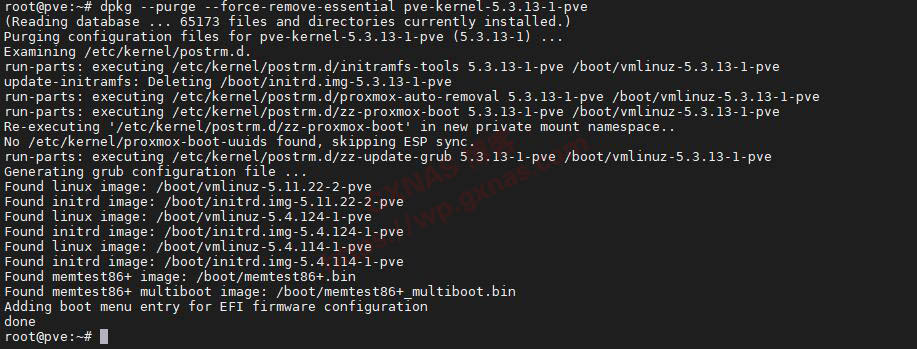
#卸载无用内核,命令后面的pve-kernel-5.3.13-1-pve,是根据上一条命令显示出来的内核,需要修改成你自己PVE显示不用的,后面显示有purge字样的为系统使用中,不可以卸载的,其他的均可以卸载)
dpkg --purge --force-remove-essential pve-kernel-5.3.13-1-pve
dpkg --purge --force-remove-essential pve-kernel-5.3.13-3-pve
dpkg --purge --force-remove-essential pve-kernel-5.3.18-1-pve
dpkg --purge --force-remove-essential pve-kernel-5.3.18-2-pve
dpkg --purge --force-remove-essential pve-kernel-5.3.18-3-pve
dpkg --purge --force-remove-essential pve-kernel-5.4
dpkg --purge --force-remove-essential pve-kernel-5.4.101-1-pve
dpkg --purge --force-remove-essential pve-kernel-5.4.103-1-pve
dpkg --purge --force-remove-essential pve-kernel-5.4.106-1-pve
dpkg --purge --force-remove-essential pve-kernel-5.4.114-1-pve
dpkg --purge --force-remove-essential pve-kernel-5.4.119-1-pve
dpkg --purge --force-remove-essential pve-kernel-5.4.124-1-pve
dpkg --purge --force-remove-essential pve-kernel-5.4.34-1-pve
dpkg --purge --force-remove-essential pve-kernel-5.4.41-1-pve
dpkg --purge --force-remove-essential pve-kernel-5.4.44-1-pve
dpkg --purge --force-remove-essential pve-kernel-5.4.44-2-pve
dpkg --purge --force-remove-essential pve-kernel-5.4.55-1-pve
dpkg --purge --force-remove-essential pve-kernel-5.4.60-1-pve
dpkg --purge --force-remove-essential pve-kernel-5.4.65-1-pve
dpkg --purge --force-remove-essential pve-kernel-5.4.73-1-pve
dpkg --purge --force-remove-essential pve-kernel-5.4.78-1-pve
dpkg --purge --force-remove-essential pve-kernel-5.4.78-2-pve
dpkg --purge --force-remove-essential pve-kernel-5.4.98-1-pve

#把不用的内核删除完成后,更新引导菜单
update-grub
#重启PVE
reboot
8、进入PVE以后,系统可能还会自动重启3-4次,属于正常现象,请耐心等候,不要以为机子出了问题。等机器不再重启后,就可以把虚拟机启动起来。
9、优化PVE:
#安装时间同步工具,自动同步时间
apt install chrony -y
#安装网络配置修改后自动应用刷新的工具
apt install ifupdown2 -y
#删除以前的时间同步工具
apt remove systemd-timesyncd -y
apt-get remove --purge systemd-timesyncd
10、再回到网页端,已经更新到7.0-10了。
2020年7月27日更新:
如果你的PVE还是5.X版本,是不可以直接从5.X升级到7.0的。需要先从5.X升级到6.0,然后才可以从6.0升级到7.0。5.X升级到6.0的教程,可以看【PVE5.4升级到6.0教程】这个教程。


文章评论
感谢。我百度搜一下还看见有博客收费的,幸好还是有人乐意分享这些经验。
7.1 怎么升级7.2啊 好像跨Debian 版本了
@mute PVE我已经弃坑了,所以没怎么去深入研究,你百度搜索一下,网上应该有教程。
用回5.11内核,
命令,apt-get install pve-kernal-5.11 -y
然后,apt autoremove pve-kernal-5.13 -y #针对用的内核是5.13,如果不是5.13那么,需要在命令改内核版本。比如你用的是5.15,那么相应的命令是:apt autoremove pve-kernal-5.15
确认命令完成后,输入以下命令:
reboot
我使用的这个命令退回5.11内核,但是重启以后发现还是5.13
@大象艾拉斯 善用互联网搜索功能,你能发现更多有用的东西
大神你好,请教下安装PVE 7.1之后系统时间是对的但是主板bios时间相差8小时,手动调整了主板bios时间之后重启一次就又变成差8小时了,这种情况怎么调整让bios时间和系统时间一致啊?
@zdd 先看一下PVE这个/etc/timezone文件的时区里面是不是Asia/Shanghai,如果不是就改。然后在PVPE的SSH下做一次时间同步sntp -P no -r pool.ntp.org,最后写入硬件时钟hwclock --systohc。
@博主 多谢大佬指教
@zdd 再请教下,PVE安装黑群晖PVE管理界面的关机按钮关闭不了群晖系统,这种情况有没有啥解决办法啊?
@zdd 6.x版本的群晖可以安装pve关机补丁,7.x的目前暂时没有pve补丁